
Just Step Up Level 1 from the Badminton Malta Step Up Awards Scheme. Content below is taken from the original level PDF.
About the Scheme
What is the Scheme?
The Badminton Malta Step Up Scheme is available to provide a staged learning approach to developing various technical, tactical and physical attributes needed to improve your skills as a badminton player.
Who are they aimed towards?
The scheme has been developed and is accessible for anyone who wishes to learn and test themselves against each of the scheme levels from a complete beginner through to a regular club or competitive player.
What are the levels of awards?
Currently there are six scheme levels, these are aligned roughly with both the Badminton Malta Player Concept model as well as the Badminton Malta Academy groups. They roughly support 2 scheme levels for each stage of the Academy in Foundations, Cadets and Development. This scheme level is not an overall level of play but a guideline of the skills you should develop at various levels.
How are they run and assessed?
The scheme will be run by Badminton Malta Academy Coaches over two assessment days per year. When these are announced your coach can advise you as to whether you are at a level to attempt any of the scheme levels for the upcoming event. The Level 1 Scheme will also be offered as part of the Just Hit It schools projects.
What are the costs / What do you receive?
The cost of the scheme assessment day will be €10 per assessment day. This cost will go towards the assessment day, coaches for assessments, a certificate of achievement and a level specific Badminton Malta Step Up Scheme keychain of which there will be 6 to collect. The scheme prizes will be distributed at the Badminton Malta Awards Night.
Skill 1 — Basic Grip
A player will be required to change the grips used constantly throughout a rally in badminton to effectively play different strokes. The Basic Grip is one of these and will be used for some of the following skills. The Basic Grip is used to play strokes where the shuttle is level with the player and will be used for strokes such as the Forehand Clear, Dropshot, Net Shots and Lifts.
How It Should Look
The thumb and first finger of the hand creates a “V” shape on the racket handle. The position of the bottom of the “V” is important. Below are images of where the bottom of the “V” should be in relation to the racket handle.
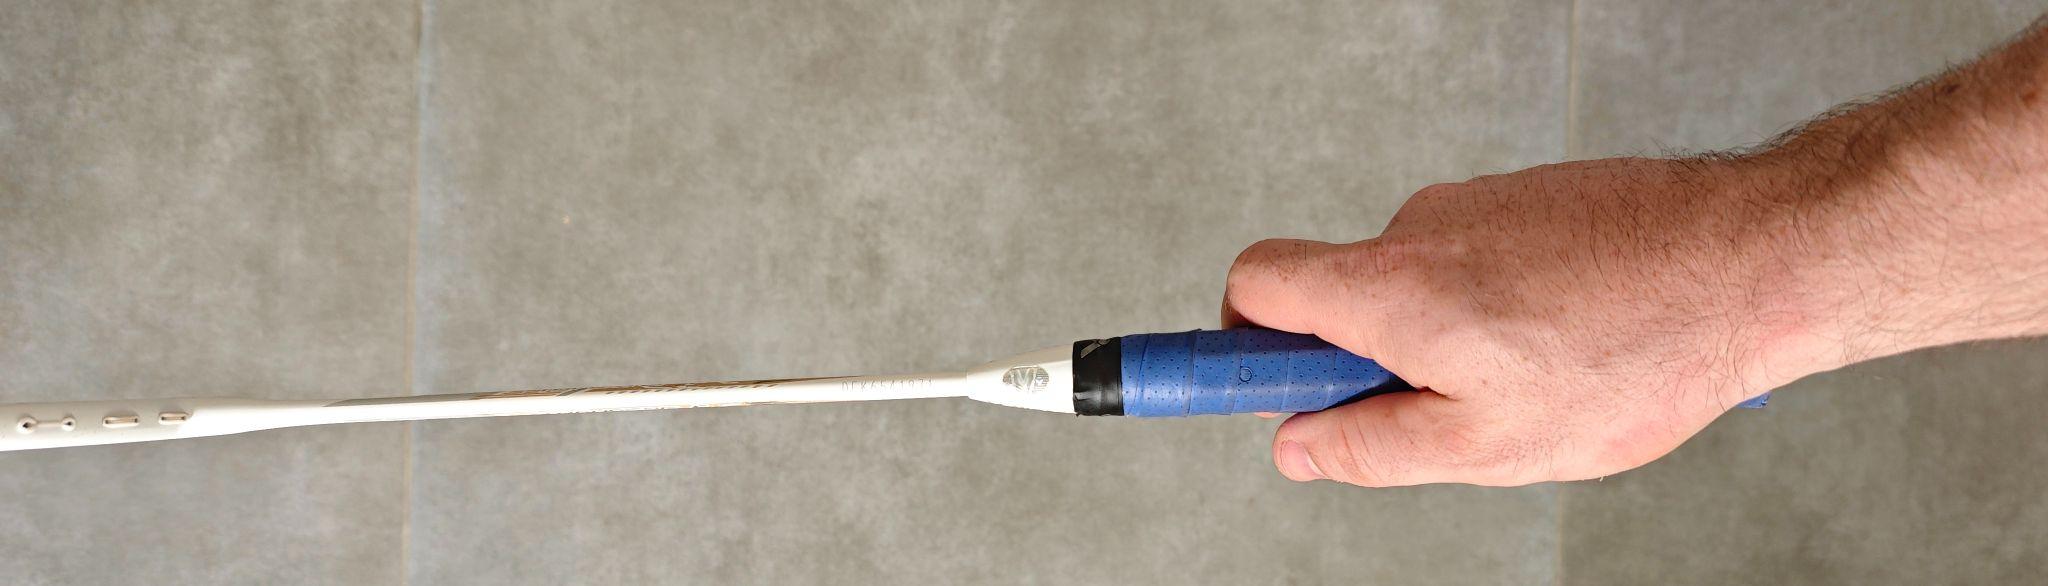
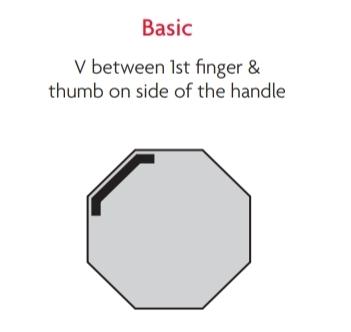
Coaching Notes
- Grips always relaxed to allow grip change, produce more power
- Forehand V grip/Side on grip
- Grips are tightened on the forward swing of the stroke. This generates power and stabilises the racket head. The amount of tightening depends upon power needed.
- Follow through, and keep racket in same flat position ready for next shot Not all strokes on the forehand side will use this grip. Changes will be required for forehand net kills, forehand blocks, deep forehands and overhead slices
Skill 2 — Thumb Grip
A player will be required to change the grips used constantly throughout a rally in badminton to effectively play different strokes. The Thumb Grip is one of these and will be used for some of the following skills. The Thumb Grip is used to play shots such as backhand net shots and backhand lifts as well as the backhand short serve.
How It Should Look
The thumb should be placed along the bevel of the racket handle that allows a gap between the palm of the hand and the handle.
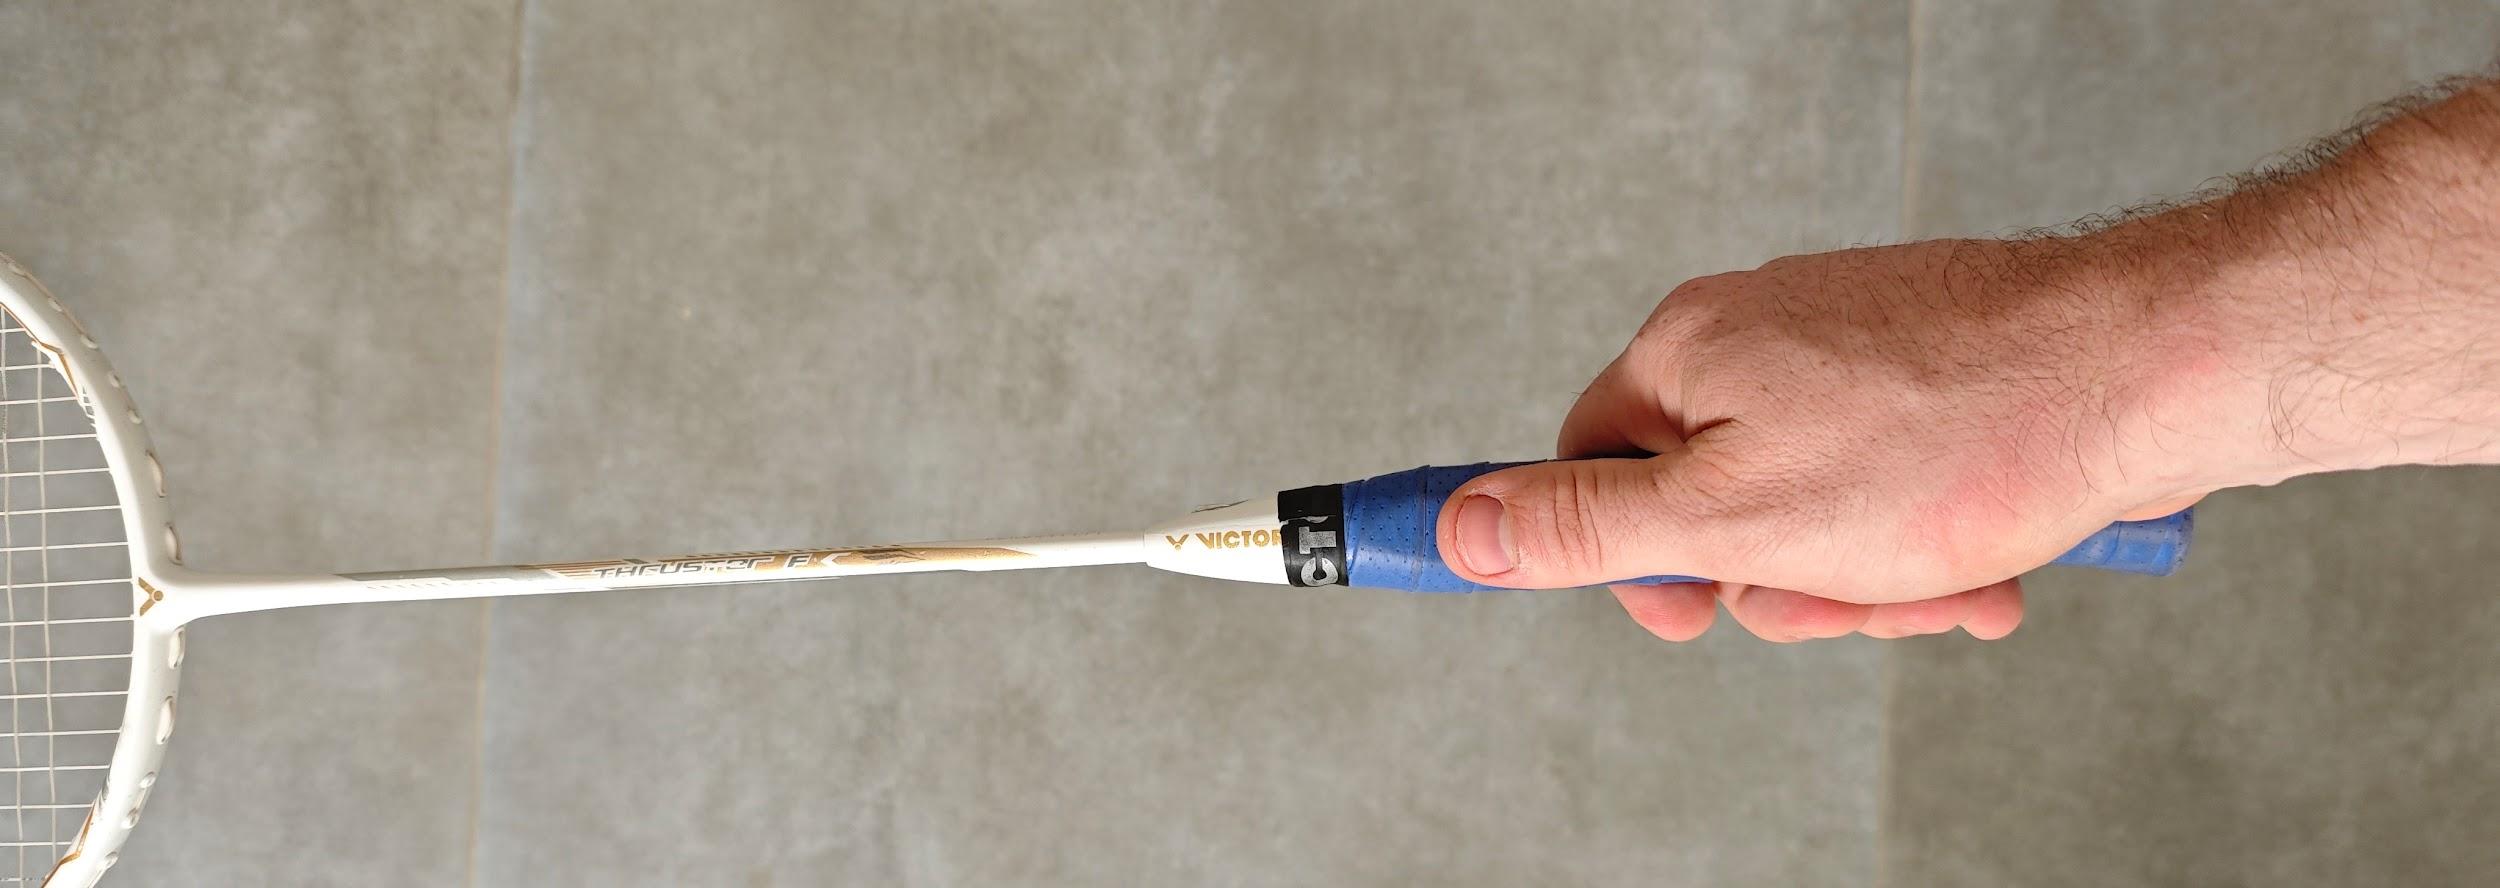
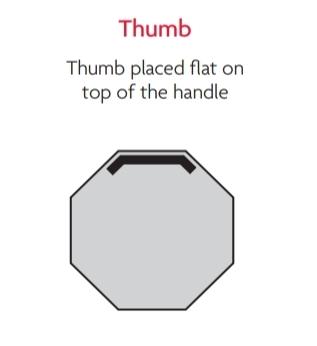
Coaching Notes
- Thumb along bevel
- Relaxed grip leaving space between the handle and palm
- Racket strings should be facing upwards and in the same direction as the knuckles
- Racket head can follow through and be ready in flat position for next shot Not all strokes on the backhand side will use this grip. Other grip variations will be needed for strokes such as crosscourt net shots or block and overhead backhand strokes
Skill 3 — Basic Grip Keepy Ups
The focus of this skill is for a player to show the use of the Basic Grip while showing some basic control and coordination of the racket and shuttle.
How It Should Look
The Basic Grip is used by the player, they will attempt to keep 10+ continuous repetitions of keeping the shuttle in the air. The player will take an open lunge stance with arms out for balance and aim to strike the shuttle around the chest to head height.
Skill 4 — Thumb Grip Keepy Ups
The focus of this skill is for a player to show the use of the Thumb Grip while showing some basic control and coordination of the racket and shuttle.
How It Should Look
The Thumb Grip is used by the player, they will attempt to keep 10+ continuous repetitions of keeping the shuttle in the air. The player will take an open lunge stance with arms out for balance and aim to strike the shuttle around the chest to head height.
Skill 5 — Alternating Grip Keepy Ups
The focus of this skill is for a player to show the ability to change grips during play alternating between Basic and Thumb Grip while showing some basic control and coordination of the racket and shuttle.
How It Should Look
The player will start with either of the grips and then change alternating from one to the other following each successful contact while the shuttle is in the air. The aim is still to gain 10+ continuous hits. The player will take an open lunge stance with arms out for balance and aim to strike the shuttle around the chest to head height.
Coaching Notes
- Players are allowed to move around the hall in any direction and use any space available
- Players can hit the shuttle at various heights with a good guide at between 1-2m above the racket.
- Encourage players to step onto racket foot on contact with the shuttle
- Use arms for balance and hit away from the body at a comfortable distance
- Small follow throughs to allow time to prepare for the next stroke
Assessments 1 - 5 - Grip & Keepy Ups
Assessment Criteria Basic Grip
V Grip in the correct position on the racket
Relaxed Grip held in the fingers Thumb Grip
Thumb placed along the racket handle bevel
Relaxed Grip held with space between the palm and handle Task Repetitions Assessment Qualities Basic Grip Keepy Ups 10 + continuous repetitions (3 attempts allowed)
- Basic Grip
- Roughly 1-2m in height
- Shows Control Thumb Grip Keepy Ups 10+ continuous repetitions (3 attempts allowed)
- Thumb Grip
- Roughly 1-2m in height
- Shows Control Alternating Keepy Ups 10+ continuous repetitions (3 attempts allowed)
- Successfully alternates between grips
- Roughly 1-2m in height
- Shows Control
Skill 6 — Basic Chassis
The chassis is a vital movement in badminton footwork and is part of the approach and recovery phases, it allows a player to move sideways at a quick speed and due to the size of the court is very commonly used to move into all areas of the court in different situations.
How It Should Look
The chassis step should show one foot chasing the other without quite catching up, these can be done with feet parallel to each other or even at a 90* angle. The player should look like they just skim across the surface. Players should have bent knees while staying on the balls of their feet.
Skill 7 — Basic Lunges
The Lunge is another vital part of badminton footwork and is associated with the hitting phase of a stroke. The lunge allows a player to stop when they are due to play a stroke, while also allowing them to initiate the start of the recovery back to centre of the court. A good lunge will provide stability of the body while hitting precise strokes.
How It Should Look
The lunge is a large stride where the lead foot should be pointing in the direction of movement. The leg, knee and foot should all face in the same direction for stability, power and injury prevention. The rear foot in a lunge can be turned out to provide additional stability while using non racket arm for balance
Skill 8 — Split Step
The split step is the most important part of badminton footwork and is the starting phase of all movement patterns. The split step allows a player to link movements together, change direction and move off quickly in response to an opponent's stroke.
How It Should Look
The split step should look like a small jump just before your opponent hits their stroke. A widening of the base and bending of the knees will create balance and allow for a powerful first step. The upper body will be relaxed and central between the feet with a slight forward bend at the hips, this provides body control and power to move fast in every direction. The split step can be done in parallel form, feet side by side, with the right or with the left foot in front depending on various tactical situations.
Assessment 6 - 8 - Chassis, Lunge & Split Step
Lunge & Split Step Assessment Procedures Chassis
The player starts in the centre of the court and demonstrates a chassis movement to the forehand singles line and back 4 times at a steady pace (No lunge is needed), the player then completes another 2 repetitions at a faster pace .
The player starts in the centre of the court and demonstrates a chassis movement to the backhand singles line and back 4 times at a steady pace (No lunge is needed), the player then completes another 2 repetitions at a faster pace.
Players can now play a 2 minute game of line tag, using only the badminton court lines using only chassis movements. Lunge
Players stand upright and then step forwards to show a good lunge position which is held for 5 seconds, this is repeated on both legs, it is important that players do not put their hands on the lunging leg for support.
Players complete one length of a badminton court completing alternating lunges with a cone balanced on the top of their head.
Players stand upright and complete a lunge at the correct angle as indicated by the coach. The coach will use a clockface of 1 - 12, shouting out a number the player will perform a lunge at that time and return back to the centre. This is completed for 3 rounds (1 - Right leg only, 2 - left leg only, 3 - players choice) Split Step
Players stand inside the side tramlines and complete 5 split steps with feet travelling from inside to outside of the lines. This is then repeated using the rear tramlines.
Players stand in some space and are required to complete a split step everytime th coach hits a shuttle. The coach can hit the shuttle continuously up in the air.
Players play split catch. Two players stand opposite each other, player A throws an underarm throw just to the right or left of player B. Then player B performs a split step and moves to intercept the shuttle and catches in the centre of their body.